转载原文出处:http://blog.csdn.net/chseangs/article/details/4520733
对于STM32的SPI ,Reference Manual中是给出的schematic如下:
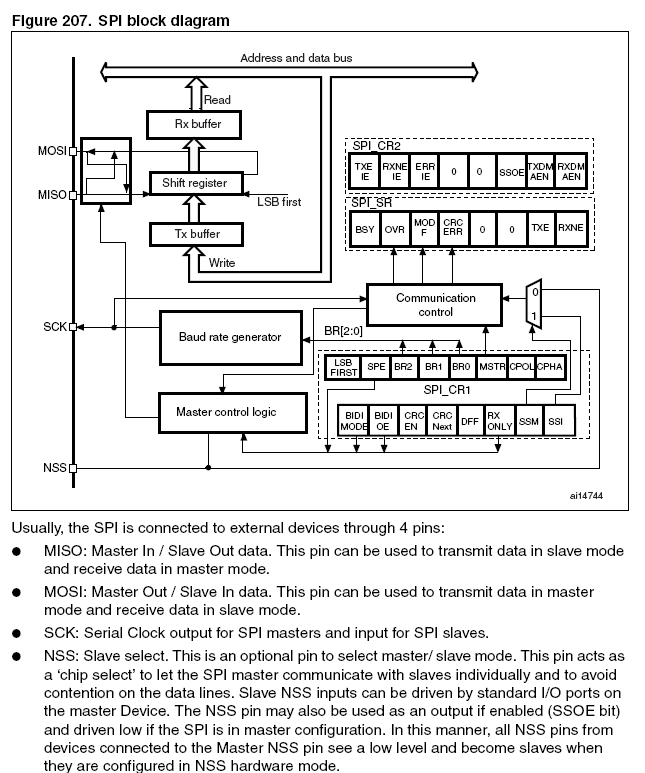
按照标准的SPI协议,当SPI被配置为主机模式后,通过SPI对从设备进行操作时,其NSS应该自动置低,从而选中(使能)从设备;一旦不对从设备进行操作,NSS立刻置为高。
但是,我在实际调试过程中却发现:STM32 SPI NSS无法自动实现跳变。 一旦SPI初始化完成并使能SPI,NSS立刻置低,然后保持不变。
这个问题一直无法解决,直到我在ST官方论坛上看到国外有些技术人员也在讨论这个问题,他们得出的结论是:STM32 SPI NSS无法自动跳变。
| RichardE |  Posted 24-07-2009 at 16:07 Posted 24-07-2009 at 16:07 | ||
Registered on : 11-05-2005 From UK (United Kingdom) Messages : 19 |
|
ST官方技术人员也证实:STM32 SPI NSS是不会自动置位和复位的。按照官方说法,ST已经将其列入了改进计划。
对于这个问题,可以采用下面的方法解决:
在SPI初始化时,采用NSS soft模式,然后使能NSS输出功能。从而将NSS当做GPIO使用,通过软件set和reset来实现NSS的置位和复位。
具体代码如下:
/* SPI1 configuration ------------------------------------------------------*/
SPI_InitStructure.SPI_Direction = SPI_Direction_1Line_Tx;
SPI_InitStructure.SPI_Mode = SPI_Mode_Master;
SPI_InitStructure.SPI_DataSize = SPI_DataSize_8b;
SPI_InitStructure.SPI_CPOL = SPI_CPOL_Low;
SPI_InitStructure.SPI_CPHA = SPI_CPHA_2Edge;
SPI_InitStructure.SPI_NSS = SPI_NSS_Soft; //
SPI_InitStructure.SPI_BaudRatePrescaler = SPI_BaudRatePrescaler_4;
SPI_InitStructure.SPI_FirstBit = SPI_FirstBit_MSB;//SPI_FirstBit_MSB;
SPI_InitStructure.SPI_CRCPolynomial = 7;
SPI_Init(SPI1, &SPI_InitStructure);
/*Enable SPI1.NSS as a GPIO*/
SPI_SSOutputCmd(SPI1, ENABLE);
/*Configure PA.4(NSS)--------------------------------------------*/
GPIO_InitStructure.GPIO_Pin =GPIO_Pin_4;
GPIO_InitStructure.GPIO_Mode=GPIO_Mode_Out_PP;
GPIO_Init(GPIOA, &GPIO_InitStructure);
通过将NSS配置为GPIO,在通过SPI操作从设备时,就可以通过软件来选中和释放从设备了。虽然比起硬件自动置位要麻烦,但问题毕竟解决了。
进一步阅读长达900页的Manual,我发现,文中对于SPI hard模式的描述并非大多数人所认为的硬件SPI,原文如下:
Slave select (NSS) pin management
There are two NSS modes:
● Software NSS mode: this mode is enabled by setting the SSM bit in the SPI_CR1
register (see Figure 209). In this mode, the external NSS pin is free for other
application uses and the internal NSS signal level is driven by writing to the SSI bit in
the SPI_CR1 register.
● Hardware NSS mode: there are two cases:
– NSS output is enabled: when the STM32F20xxx is operating as a Master and the
NSS output is enabled through the SSOE bit in the SPI_CR2 register, the NSS pin
is driven low and all the NSS pins of devices connected to the Master NSS pin see
a low level and become slaves when they are configured in NSS hardware mode.
When an SPI wants to broadcast a message, it has to pull NSS low to inform all
others that there is now a master for the bus. If it fails to pull NSS low, this means
that there is another master communicating, and a Hard Fault error occurs.
– NSS output is disabled: the multimaster capability is allowed.
当SPI配置为hard模式后,通过检测NSS可以实现的是自身主机和从机模式的切换,而不是大多数人所认为的自动NSS。。。也就是说:在一个多SPI系统中,STM32 SPI通过NSS检测,一旦发现系统中无NSS低信号,自己就输出低,从而成为主机;当系统中有NSS低信号时(及已经有其它SPI宣布为主机),自己就配置为从机。 所谓的hard模式的NSS,实际就是为了实现多机间通信的。
小结:
望文生义很可怕,Manual要仔细研读。
STM32的SPI NSS不论是配置为soft还是hard都是无法自动置位的,但这却是大多数应用所需要的。正如ST 论坛上RichardE所说:“Everything would be done by the peripheral. Fire and forget.”
呵呵,有趣的说法:Fire and forget! ~~~~

